Category Archives: Technology junk

I’m a SAN administrator. Stuff relating to system/network/storage administration goes here.

Adito Security Certificate – Pain in the butt, but possible

Adito (formerly OpenVPN-ALS) is an amazingly wonderful piece of software. Honestly I can’t figure out why more FOSS advocates don’t pick up the pieces of the project and continue to develop on it. I guess largely it does what it’s supposed to do and doesn’t need much in the way of updating, though it would be nice if the plugin repositories were still up and running and such.

That said, I run Adito in 3 locations. For 2 of my locations the self-signed server certificate Adito creates and installs during the setup wizard is adequate. For 1 location though I prefer to offer the appearance of a truly secure and trusted site.

I’ll start by sharing the links I had to visit and inquire with to make all this work in case my write-up falls short for anyone reading it:

Discussion Topic on Sourceforge page

Instructions and discussion – Import private key and certificate into Java Key Store from agentbob.info

Github page for importkey tool that I used

I perused many many other pages, but these 3 gave me all the parts I needed to complete my task.

The server tools you’ll need will be openssl and jdk which you’ll have as a prerequisite to adito.

My installation is performed on CentOS 6.3 with Java jdk 1.7.0 u13. If any of the command I tell you to issue below don’t work it’s probably because your path is broken to java binaries.

It helps to create a working directory on your server so that all your files are glommed together in one place and not mixed in with other junk. Before you finish there will be quite a collection.

Step one – create your private key and certificate request:

openssl req -out fqdn.csr -new -newkey rsa:2048 -nodes -keyout fqdn.key

As a sidenote, if you compare this documentation with that of the folks on the Sourceforge discussion bored you’ll see that I skipped one of their steps. I’m fairly certain the `openssl req -x509` business is unnecessary. If someone can prove me wrong please let me know and I’ll update this documentation to reflect that.

Step two – submit your CSR (fqdn.csr from above) to the company you wish to issue you a certificate, follow their instructions to get your 3rd party trusted cert. In my case I was provided with 3 certificates in return, the one signed against my CSR, an intermediate and a root. Making note of what they need bundled together to form a valid chain is going to be important, and it will be different for each company. Put your fqdn.crt, intermediate.crt and root.crt into your working folder.

Step three – Convert all of your PEM formatted .crt files into DER format:

for cert in fqdn.crt intermediate.crt root.crt; do openssl x509 -in $cert -inform PEM -out cert.der -outform DER; done

Step four – Convert your private key to DER format as well:

openssl pkcs8 -topk8 -nocrypt -in fqdn.key -inform PEM -out fqdn.key.der -outform DER

Step five – cat the certificates together. I’m not sure if order matters, but I did it from my cert back to the root and that worked:

cat fqdn.crt.der intermediate.crt.der root.crt.der > fqdn.bundle.crt.der

Step six – Copy the ImportKey.java source to your machine. You can just click on the link either here or from the agentbob.info link above and copy/paste the source into a text editor on your server. I had to make a change in the source (following the advice of somebody else who had a similar problem and posted the solution in the agentbob.info article’s comments) in order for the tool to work with chained/bundled certificates. I’ve created a diff to use to patch said source, you can also just copy and paste it into your text editor.

patch ImportKey.java ImportKey.java.diff

Step seven – Compile and run the ImportKey application:

javac ImportKey.java

java ImportKey fqdn.key.der fqdn.bundle.crt.der

Note that the resulting keystore file is going to be in your home directory, so if you’re running as root it will be /root/keystore.ImportKey. It has the alias “importkey” as well as the keystore password “importkey”; CHANGE IT:

Step eight – change the keystore password for your keystore:

keytool -importkeystore -srckeystore /root/keystore.ImportKey -destkeystore importkey.jks

When running the above command you’ll be asked to issue the new keystore password – do it. It will eventually ask you for the source keystore password, as mentioned above that password is “importkey”.

If your adito server doesn’t have a web browser you need to get the file to a machine that does have a web browser, as it’s through the web interface that we’ll be importing the newly created keystore – do that now.

Step nine – rerun `ant install`from your adito installation directory, if your adito server is currently running, stop it:

cd /opt/adito0.9.1
/etc/init.d/adito stop
ant install

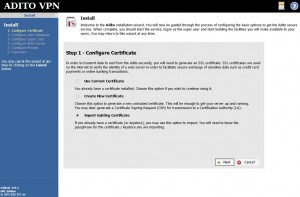
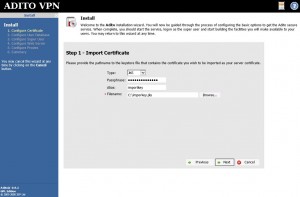
Step nine, part 2 – When you get to the bit about “Starting installation wizard……….Point your browser to http://aditoserver:28080″ do just that. There will be 2 screens to be concerned with:

Select “Import Existing Certificate” on the first screen.


Fill in all the pertinent information on the following screen. (ignore my typo please)

The remaining install screens should remember your settings from the prior install. If this is your first time running `ant install`, configure according to your needs.

When finished issue an adito start command:

/etc/init.d/adito start

And you should be finished. Open your adito site in a browser and verify your new certificate is installed and being presented.
 

Bareos/Bacula VMware backup part 2

Today I added the components that create a logfile and cleans up the working directory when done. The idea behind the logfile is that using the information in it a person with no knowledge about the original backup could use the files to create a running restore of the VM. I may someday create a restore script, but not today. The cleanup portion is not working 100%, but good enough that I will use the script in my production starting today. I will debug and fix it later. Here is the Bareos job log for my first full & successful running of the script/backup combo:

bareos-dir Job vmguest-FullImage.2013-10-21_16.02.35_06 waiting 50 seconds for scheduled start time.
bareos-dir shell command: run BeforeJob "/usr/lib/bareos/scripts/vmprep.py -v vmguest.domain.local"
bareos-dir BeforeJob: Found the VMX file and copied it to the backup location /mnt/vmbackup/
 BeforeJob: Successfully created a snapshot for your VM
 BeforeJob: successfully backed up /vmfs/volumes/datastore1/vmguest.domain.local/vmguest.domain.local.vmdk to the backup location /mnt/vmbackup/
 BeforeJob: successfully backed up /vmfs/volumes/550a2145-64112148/vmguest.domain.local/vmguest.domain.local_1.vmdk to the backup location /mnt/vmbackup/
 BeforeJob: I deleted the snapshot I took earlier, all is good.
 Start Backup JobId 226, Job=vmguest-FullImage.2013-10-21_16.02.35_06
 Using Device "FileStorage" to write.
bareos-sd Volume "VM0015" previously written, moving to end of data.
 Ready to append to end of Volume "VM0015" size=64551931043
bareos-sd User defined maximum volume capacity 107,374,182,400 exceeded on device "FileStorage" (/home/bareos/storage).
bareos-sd End of medium on Volume "VM0015" Bytes=107,374,157,986 Blocks=1,664,406 at 21-Oct-2013 16:23.
bareos-dir Created new Volume "VM0016" in catalog.
bareos-sd Labeled new Volume "VM0016" on device "FileStorage" (/home/bareos/storage).
 Wrote label to prelabeled Volume "VM0016" on device "FileStorage" (/home/bareos/storage)
 New volume "VM0016" mounted on device "FileStorage" (/home/bareos/storage) at 21-Oct-2013 16:23.
bareos-sd Elapsed time=00:17:42, Transfer rate=44.48 M Bytes/second
bareos-dir Bareos bareos-dir 12.4.4 (12Jun13):
 Build OS: x86_64-unknown-linux-gnu redhat CentOS release 6.2 (Final)
 JobId: 226
 Job: vmguest-FullImage.2013-10-21_16.02.35_06
 Backup Level: Full
 Client: "bareos-fd" 12.4.4 (12Jun13) x86_64-unknown-linux-gnu,redhat,CentOS release 6.2 (Final)
 FileSet: "VM Image Backup NFS Folder" 2013-10-19 16:56:07
 Pool: "VMImage" (From command line)
 Catalog: "MyCatalog" (From Pool resource)
 Storage: "File" (From command line)
 Scheduled time: 21-Oct-2013 16:03:25
 Start time: 21-Oct-2013 16:07:24
 End time: 21-Oct-2013 16:25:08
 Elapsed time: 17 mins 44 secs
 Priority: 10
 FD Files Written: 7
 SD Files Written: 7
 FD Bytes Written: 47,245,718,876 (47.24 GB)
 SD Bytes Written: 47,245,719,792 (47.24 GB)
 Rate: 44403.9 KB/s
 Software Compression: None
 VSS: no
 Encryption: no
 Accurate: no
 Volume name(s): VM0015|VM0016
 Volume Session Id: 18
 Volume Session Time: 1382202217
 Last Volume Bytes: 4,458,527,606 (4.458 GB)
 Non-fatal FD errors: 0
 SD Errors: 0
 FD termination status: OK
 SD termination status: OK
 Termination: Backup OK
 shell command: run AfterJob "/usr/lib/bareos/scripts/vmprep.py -v vmguest.domain.local -p"
bareos-dir AfterJob: I couldn't find file /mnt/vmbackup/vmguest.domain.local.vmdk!
 AfterJob: You may want to look at /mnt/vmbackup/
 AfterJob: Cleaned out the backup location, ready for the next round.

Per the request below I’ve attached my vmprep.py script (rename vmprep.py.txt to vmprep.py). I’m not a programmer, so don’t hate me if it blows up your stuff.

vmprep.py

VMware image backup with Bareos – More free backup

Bareos (Bacula if you like) does a great job of backing up files. In the event of a total meltdown I really would prefer the ability to restore an entire VM as opposed to rebuilding and installing agents prior to restore. Let’s see if I can make this work.

Brainstorming:

In the grand scheme, the server to be backed up will be localhost. The files will exist on an NFS volume accessible to both the VMware host VMkernel and localhost.

We will take a snapshot of the running VM, then copy the VMDK out to that NFS location using a run-before script. We will be able to put it in location predictable to Bareos and use the appropriate fileset definition to go out and grab that set of files for each job/vm. We will the use a run-after script to delete the snapshot and the backed up files out on that NFS.

To test how realistic this is at all I’m going to use a “junk” vm to copy a snapshotted VMDK and associated vmx file and try to see if I can get that portion up and running.

To create the snapshot in the busybox console:

vim-cmd vmsvc/snapshot.create 17 "bareos_backup" "Temporary snapshot for Backup system. This should not exist if a backup isn't currently running."

The ’17’ in that command references a vmid. That will have to be parsed using the command:

vim-cmd vmsvc/getallvms

To be dealt with as I script it out.

I started the copy of my 40GB vmdk at 1:29PM…

off for coffee…

Done by 1:54PM, possibly sooner but I wasn’t looking. Now I’ll copy the vmx file and see if I can mangle it enough to make the thing boot.

— next morning —

The bad news is that I couldn’t get the copied disk to work easily. A bit of research learned me that I should have used vmkfstools to copy the snapshotted file, so I tried again that way. Here was my command:

vmkfstools -i
 source.vmdk /vmfs/volumes/dst_datastore/restoretest/restoretest.vmdk -d thin

After running that command and also copying the vmx file, I imported the vmx in the new location, removed the existing disk and added a new disk using the newly relocated vmdk – it booted. Another bonus came from using vmkfstools instead of cp, that being I was able to specify to create a thin disk on the destination end. This cut the copy time down to about 4:32 and I have a smaller file to backup. Now that I know the whole process is relatively possible, I’ll do the pre and post-job scripts in Python.

— next evening —

I spent the entire day creating the before backup job and am right now running my first end to end trial. The Bareos definitions read like this:

JobDefs {
  Name = "VM"
  Type = Backup
  Level = Full
  FileSet = "VM Image Backup NFS Folder"
  Storage = File
  Messages = Standard
  Priority = 10
  Pool = VMImage
}
Job {
  Name = "vmguest1-FullImage"
  JobDefs = "VM"
  Client = bacula-srv-fd
  Schedule = "Monthly-VMImage-vmguest1"
  RunBeforeJob = "/usr/lib/bareos/scripts/vmprep.py -v vmguest1.gsellc.local"
}
FileSet {
  Name = "VM Image Backup NFS Folder"
  Include {
    Options {
    signature = MD5
    }
  File = "/mnt/vmbackup"
  }
}

/mnt/vmbackup is an NFS mounted directory that both my ESXi hosts and my Bareos director can access. It’s the handoff point, ESX copies the VMDKs there, then Bareos picks them up and stuffs them onto backup media. The before-backup script identifies the VM we want to use, takes a snapshot then copies it to the staging location.

Unfortunately it would seem that Bareos likes to backup sparse files, not disk blocks. This means that while my test VM uses about 35 GB on disk, Bareos is transferring 160 (compressed) GB to tape, so the backup will take awhile. At the end of the day it takes the same amount of space on tape, it just increases the backup window.

I have yet to write the cleanup job that will delete the files, this is an important component and will be what I do next. As it stands, I have something that kind of works to polish and shine into something totally usable. The other big ToDo is I want to leave traces of what the backup is in the backup. Meaning I want to add a backup logfile that can be used at restore time to see what the guest’s name was, what ESX host it lived on, where it kept its VMDKs and all that. All of the information is already stored in the before job script, it just needs to be put together in a pretty file and left in the staging directory. I also am considering adding options for quiescing, but that is low on my priority list.

My first backup on my 160 GB test machine took just about 2 hours – a little more. It looks like in my environment my backups are going to take about 45-50 for each GB of ALLOCATED disk. I can tolerate this as I only plan on backing up whole VM images once a month or so, maybe once a week for VERY dynamic machines or machines that are less about data and more about application. I will not be relying on this as a substitute for traditional agent based backups.

I think that’s enough of a knowledge dump on this topic for 1 post. More to come.

New Nagios Plugin

Last Friday going into the weekend I ran across a snapshot on one of my VMware hosts almost 160 days old, OUCH. The right tool to keep that from happening is definitely Nagios. NagiosExchange didn’t really have a solution for my problem that I could find. Somebody has written a snapshot age tool in PowerShell but I’m not interested in having plugins run on hosts that aren’t my main Nagios server. I was given a fun project to work on.

The vSphere Command Line Interface (formerly the PERL toolkit if I’m not mistaken) was of little help. It didn’t really give me any interface into snapshot data at all. I decided the simplest solution would be to work right on the BusyBox console. I started Friday around noon and working on it here and there over a couple days came up with a usable product yesterday morning:

[jrdalrymple@nagios ~]$ /usr/local/nagios/libexec/check_snapshot.py
No password specified
usage: check_snapshot.py -H hostname [-U username] <-P password | -f PasswordFile>
[jrdalrymple@nagios ~]$ sudo /usr/local/nagios/libexec/check_snapshot.py -H 172.16.100.11 -U nagioschk -f /home/nagios/.check_esxi_hw.pw -w 10 -c 20

3 VMs are CRITICAL
Guest example1.domain.local has snapshot 24 days old!
Guest example2.domain.local has snapshot 28 days old!
Guest example3.domain.local has snapshot 26 days old!

Clipboard03

The results between my command line run and the Nagios GUI aren’t the same because I gave the Nagios check different thresholds.

I’ll probably put it up on Nagios Exhange at some point. For now I’ll just feel accomplished.