Tag Archives: CentOS

KVM Networking, bond & bridge with VLANs

I never found a complete tutorial on setting up KVM networking the way I wanted. One thing that VMware has everyone beat on is simple and effective network configurations. KVM hosts can be just as good, but it won’t draw the pictures for you so it’s difficult to visualize what’s going on and troubleshoot it when things are going wrong.

This write-up should give you all the information you need to create a robust, bonded and VLAN aware “virtual switch” configuration on your KVM host. My config uses all native Linux networking constructs. It does not make use of the newer “team” method of interface aggregation and it definitely does not make use of Network Manager; as a matter of fact unless you have express need for it I suggest you uninstall Network Manager as it can cause grief in your configuration. As with all my other KVM related write-ups, this is based on EL7 type hosts, CentOS 7.0 in my case. If you wish to adapt it for other flavors of Linux this may still give you a good starting point.

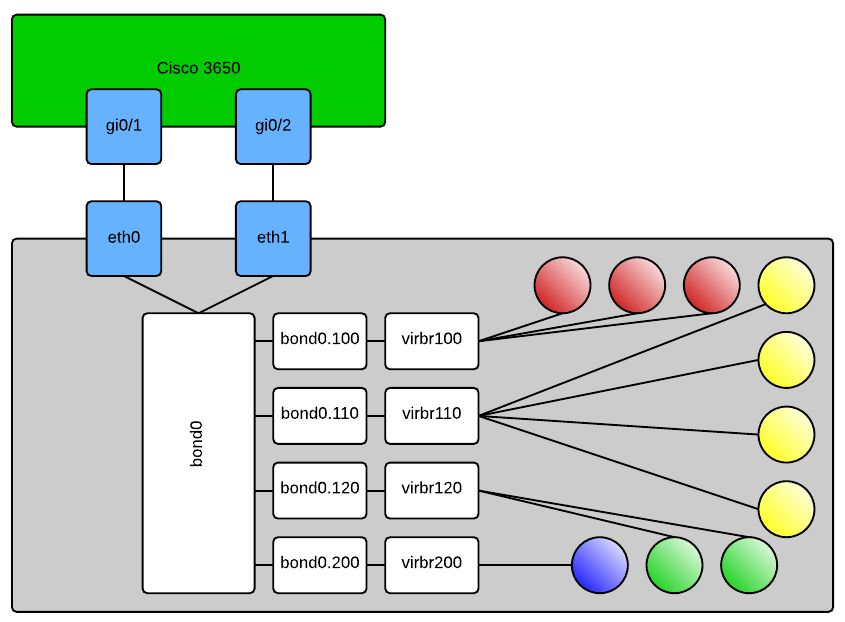
Here is an approximation of what it should look like when you’re done:


In case it’s not obvious, the shaded balls are your KVM domains. When configuring your new domains you will select the “Specify shared device name” option in virt-manager and type out the bridge you want the domain connected to. Or alternatively if you’re hand crafting your domain’s XML file it will look like this:

<interface type='bridge'>
  <mac address='ff:ff:ff:ff:ff:ff'/>
  <source bridge='virbr120'/>
  <target dev='vnet0'/>
  <model type='rtl8139'/>
  <alias name='net0'/>
  <address type='pci' domain='0x0000' bus='0x00' slot='0x03' function='0x0' />
</interface>

This would connect your VM to VLAN120 per my config above. Obviously many other things in this XML are domain and environment specific so don’t just try to copy and paste that and expect your machine to work, if you’re hand editing XML – know what you’re doing. Some of the other configs that you’ll need are as follows:

Cisco 3650:

sw# config t
sw(config)# interface range gi0/1,gi0/2
sw(config-if-range)# switchport trunk encapsulation dot1q
sw(config-if-range)# switchport trunk allowed vlan 100,110,120,200
sw(config-if-range)# switchport mode trunk
sw(config-if-range)# channel-group 1 mode on
sw(config-if-range)# exit
sw(config)# interface po1
sw(config-if)# switchport trunk encapsulation dot1q
sw(config-if)# switchport trunk allowed vlan 100,110,120,200
sw(config-if)# switchport mode trunk
sw(config-if)# description "KVM Server 1 VMNetwork bonded and trunked"

On your KVM host:

/etc/modprobe.d/bond0.conf:

alias bond0 bonding

/etc/sysconfig/network-scripts/ifcfg-eth0:

DEVICE=eth0
ONBOOT=yes
NM_CONTROLLED=no
BOOTPROTO=none
USERCTL=no
MASTER=bond0
SLAVE=yes

Make eth1 or whatever your 2nd adapter look similar, obviously change the DEVICE= line

/etc/sysconfig/network-scripts/ifcfg-bond0:

DEVICE=bond0
NM_CONTROLLED=no
ONBOOT=yes
BOOTPROTO=none
USERCTL=no
BONDING_OPTS="miimon=100 mode=4 lacp_rate=1"

/etc/sysconfig/network-scripts/ifcfg-bond0.100:

DEVICE=bond0.100
ONBOOT=yes
VLAN=yes
BOOTPROTO=none
NM_CONTROLLED=no
BRIDGE=virbr100

Like the physical interfaces, you can copy/paste this for the other VLANs you want to include in your configuration, you will have to change the DEVICE= line and BRIDGE= line in each separate config file.

/etc/sysconfig/network-scripts/ifcfg-virbr100:

DEVICE=virbr100
ONBOOT=YES
TYPE=Bridge
DELAY=0
BOOTPROTO=none

This one is another copy/paste candidate to bridge you into any of your VLAN interfaces, this time the only line you’ll need to modify as you copy and paste is DEVICE=. If you’d like you can add an IP address, subnet mask, etc to any of the bridge interfaces and then use that to connect to your KVM server. For me I prefer to have dedicated out-of-band interfaces for management purposes so all of my bridges are without layer 3 termination.

That’s it.
CentOS 7, Live Block Migration, getting the right qemu binary built and installed

You were all excited because you read my other post, but you didn’t pay attention to the part about needing a special version of qemu-kvm and were saddened to be hit with this:

error: unsupported configuration: block copy is not supported with this QEMU binary

Don’t fret, I’ll help you get where you want to go. Do everything as root, and don’t do it on a production system … duh

Get your development environment ready:

# yum install -y rpm-build redhat-rpm-config make gcc
# mkdir -p ~/rpmbuild/{BUILD,RPMS,SOURCES,SPECS,SRPMS}
# echo '%_topdir %(echo $HOME)/rpmbuild' > ~/.rpmmacros

Get your source rpm and prerequisites – note that while this is current as of this posting, things could change. Up to you to handle keeping yourself current:

# wget http://ftp.redhat.com/redhat/linux/enterprise/6Server/en/RHEV/SRPMS/qemu-kvm-rhev-1.5.3-60.el7_0.7.src.rpm
# yum install -y zlib-devel SDL-devel texi2html gnutls-devel cyrus-sasl-devel libtool libaio-devel pciutils-devel pulseaudio-libs-devel libiscsi-devel libattr-devel libusbx-devel usbredir-devel texinfo spice-protocol spice-server-devel libseccomp-devel libcurl-devel glusterfs-api-devel glusterfs-devel systemtap systemtap-sdt-devel nss-devel libjpeg-devel libpng-devel libuuid-devel bluez-libs-devel brlapi-devel check-devel libcap-devel pixman-devel librdmacm-devel iasl ncurses-devel

Build your binary:

# rpmbuild --rebuild qemu-kvm-rhev-1.5.3-60.el7_0.7.src.rpm

Install your binary and its dependencies. Enjoy blockcopy funcitonality:

# yum install -y rpmbuild/RPMS/x86_64/*

KVM Live Block Migration – My Recipe

In order for this to work you will need RHEV versions of qemu-kvm. The versions included in CentOS7 (my platform) don’t support the blockcopy command in virsh.

Start by dumping the xml for the domain to somewhere you can grab it again later:

[root@kvmhost ~]# virsh dumpxml guest1 > /var/tmp/guest1.xml

Make sure the domain is not persistent:

[root@kvmhost ~]# virsh undefine guest1
Domain guest1 has been undefined

The actual migration (you may wish to check that you’re not overwriting the target, highlighted in red):

[root@kvmhost ~]# virsh blockcopy guest1 /kvm/guest1.img /var/lib/libvirt/images/storagehost-NFS4/guest1.img --wait --verbose --pivot
Block Copy: [100 %]
Successfully pivoted

Redefine the domain, double check it:

[root@kvmhost ~]# virsh define /var/tmp/guest1.xml
Domain guest1 defined from /var/tmp/guest1.xml
[root@kvmhost ~]# virsh dominfo guest1
Id: 9
Name: guest1
UUID: e440e5bd-6d71-4807-a276-11477b764751
OS Type: hvm
State: running
CPU(s): 1
CPU time: 438.6s
Max memory: 3145728 KiB
Used memory: 3145728 KiB
Persistent: yes
Autostart: disable
Managed save: no
Security model: none
Security DOI: 0

Verify that the source file is no longer the disk in use and erase the file (if you want):

[root@kvmhost ~]# lsof | grep /kvm/guest1.img
[root@kvmhost ~]# rm /kvm/guest1.img
rm: remove regular file ‘/kvm/guest1.img’? y

Done

Adito Security Certificate – Pain in the butt, but possible

Adito (formerly OpenVPN-ALS) is an amazingly wonderful piece of software. Honestly I can’t figure out why more FOSS advocates don’t pick up the pieces of the project and continue to develop on it. I guess largely it does what it’s supposed to do and doesn’t need much in the way of updating, though it would be nice if the plugin repositories were still up and running and such.

That said, I run Adito in 3 locations. For 2 of my locations the self-signed server certificate Adito creates and installs during the setup wizard is adequate. For 1 location though I prefer to offer the appearance of a truly secure and trusted site.

I’ll start by sharing the links I had to visit and inquire with to make all this work in case my write-up falls short for anyone reading it:

Discussion Topic on Sourceforge page

Instructions and discussion – Import private key and certificate into Java Key Store from agentbob.info

Github page for importkey tool that I used

I perused many many other pages, but these 3 gave me all the parts I needed to complete my task.

The server tools you’ll need will be openssl and jdk which you’ll have as a prerequisite to adito.

My installation is performed on CentOS 6.3 with Java jdk 1.7.0 u13. If any of the command I tell you to issue below don’t work it’s probably because your path is broken to java binaries.

It helps to create a working directory on your server so that all your files are glommed together in one place and not mixed in with other junk. Before you finish there will be quite a collection.

Step one – create your private key and certificate request:

openssl req -out fqdn.csr -new -newkey rsa:2048 -nodes -keyout fqdn.key

As a sidenote, if you compare this documentation with that of the folks on the Sourceforge discussion bored you’ll see that I skipped one of their steps. I’m fairly certain the `openssl req -x509` business is unnecessary. If someone can prove me wrong please let me know and I’ll update this documentation to reflect that.

Step two – submit your CSR (fqdn.csr from above) to the company you wish to issue you a certificate, follow their instructions to get your 3rd party trusted cert. In my case I was provided with 3 certificates in return, the one signed against my CSR, an intermediate and a root. Making note of what they need bundled together to form a valid chain is going to be important, and it will be different for each company. Put your fqdn.crt, intermediate.crt and root.crt into your working folder.

Step three – Convert all of your PEM formatted .crt files into DER format:

for cert in fqdn.crt intermediate.crt root.crt; do openssl x509 -in $cert -inform PEM -out cert.der -outform DER; done

Step four – Convert your private key to DER format as well:

openssl pkcs8 -topk8 -nocrypt -in fqdn.key -inform PEM -out fqdn.key.der -outform DER

Step five – cat the certificates together. I’m not sure if order matters, but I did it from my cert back to the root and that worked:

cat fqdn.crt.der intermediate.crt.der root.crt.der > fqdn.bundle.crt.der

Step six – Copy the ImportKey.java source to your machine. You can just click on the link either here or from the agentbob.info link above and copy/paste the source into a text editor on your server. I had to make a change in the source (following the advice of somebody else who had a similar problem and posted the solution in the agentbob.info article’s comments) in order for the tool to work with chained/bundled certificates. I’ve created a diff to use to patch said source, you can also just copy and paste it into your text editor.

patch ImportKey.java ImportKey.java.diff

Step seven – Compile and run the ImportKey application:

javac ImportKey.java

java ImportKey fqdn.key.der fqdn.bundle.crt.der

Note that the resulting keystore file is going to be in your home directory, so if you’re running as root it will be /root/keystore.ImportKey. It has the alias “importkey” as well as the keystore password “importkey”; CHANGE IT:

Step eight – change the keystore password for your keystore:

keytool -importkeystore -srckeystore /root/keystore.ImportKey -destkeystore importkey.jks

When running the above command you’ll be asked to issue the new keystore password – do it. It will eventually ask you for the source keystore password, as mentioned above that password is “importkey”.

If your adito server doesn’t have a web browser you need to get the file to a machine that does have a web browser, as it’s through the web interface that we’ll be importing the newly created keystore – do that now.

Step nine – rerun `ant install`from your adito installation directory, if your adito server is currently running, stop it:

cd /opt/adito0.9.1
/etc/init.d/adito stop
ant install

Step nine, part 2 – When you get to the bit about “Starting installation wizard……….Point your browser to http://aditoserver:28080″ do just that. There will be 2 screens to be concerned with:

Select “Import Existing Certificate” on the first screen.


Fill in all the pertinent information on the following screen. (ignore my typo please)

The remaining install screens should remember your settings from the prior install. If this is your first time running `ant install`, configure according to your needs.

When finished issue an adito start command:

/etc/init.d/adito start

And you should be finished. Open your adito site in a browser and verify your new certificate is installed and being presented.