Tag Archives: Linux

CentOS sieve authentication using saslauthd

Quick solution to an infuriating problem.

Cyrus IMAP server is installed and authenticating just fine using saslauthd to my Active Directory:

/etc/imapd.conf:

...snip...
sievedir: /var/lib/imap/sieve
sendmail: /usr/sbin/sendmail
sasl_pwcheck_method: saslauthd
sasl_mech_list: PLAIN LOGIN
...snip...

/etc/sysconfig/saslauthd:

SOCKETDIR=/run/saslauthd
MECH=ldap
FLAGS="-r"

However I can’t get my sieve clients including sieveshell to authenticate:

[root@mailserver /]# sieveshell --user="first.last@example.com" --authname="first.last@example.com" localhost
connecting to localhost
connect: Connection refused
unable to connect to server at /bin/sieveshell line 170.

Telnet-ing in yielded no auth mech’s presented:

[root@mailserver /]# telnet localhost sieve
Trying ::1...
Connected to localhost.
Escape character is '^]'.
"IMPLEMENTATION" "Cyrus timsieved v2.4.17-Fedora-RPM-2.4.17-8.el7_1"
"SIEVE" "comparator-i;ascii-numeric fileinto reject vacation imapflags notify envelope relational regex subaddress copy"
"STARTTLS"
"UNAUTHENTICATE"
OK

No auth mech’s listed, e.g. PLAIN, LOGIN, etc. What gives? The search string “timsieved sasl_auth_mech” yielded 3 results on Google, luckily this page was one of them. How often is it simply that some package you need isn’t installed?

[root@mailserver /]# yum -y install cyrus-sasl-plain

That’s it:

[root@mailserver /]# telnet localhost sieve
Trying ::1...
Connected to localhost.
Escape character is '^]'.
"IMPLEMENTATION" "Cyrus timsieved v2.4.17-Fedora-RPM-2.4.17-8.el7_1"
"SASL" "PLAIN LOGIN"
"SIEVE" "comparator-i;ascii-numeric fileinto reject vacation imapflags notify envelope relational regex subaddress copy"
"STARTTLS"
"UNAUTHENTICATE"
OK

Another takeaway I learned – if you want disable TLS for just Cyrus sieve adjust your /etc/cyrus.conf as such:

  sieve         cmd="timsieved" -C /etc/sieve.conf listen="sieve" prefork=0

And just modify the /etc/sieve.conf file to suit your needs. I know this has caused me issues in the past and never knew it could be tuned separate of imapd.
OpenIndiana ZFS backed iSCSI SAN – Resize Volumes

I banged my head for a couple minutes. Resizing the ZFS is easy peasy right?

root@oi-storage:~# zfs get -Hp volsize pool0/kvm/kvmdomain
 pool0/kvm/kvmdomain       volsize 42949672960     local

Well of course that isn’t big enough…

root@oi-storage:~# zfs set volsize=42956488704 pool0/kvm/kvmdomain

No problemo, now just rescan on the Linux side right?

[root@linux-hv ~]# iscsiadm -m node --targetname iqn.2010-09.org.openindiana:02:6640d696-90b3-6709-804e-da40a0ffffff -R
[root@linux-hv ~]# dmesg
  ...
[1329034.807613] sd 4:0:0:0: [sdc] 83886080 512-byte logical blocks: (42.9 GB/40.0 GiB)
  ...

Hmm… that didn’t do it (512 * 83886080 = 42949672960). I banged around a little bit and found what I was missing:

root@oi-storage:~# sbdadm modify-lu -s 42956488704 600144f0340b80c719ff570bb7460001

Then the Linux rescan yielded more useful results:

[root@linux-hv ~]# dmesg
  ...
[1340836.125483] sdc: detected capacity change from 42949672960 to 42956488704

KVM Networking, bond & bridge with VLANs

I never found a complete tutorial on setting up KVM networking the way I wanted. One thing that VMware has everyone beat on is simple and effective network configurations. KVM hosts can be just as good, but it won’t draw the pictures for you so it’s difficult to visualize what’s going on and troubleshoot it when things are going wrong.

This write-up should give you all the information you need to create a robust, bonded and VLAN aware “virtual switch” configuration on your KVM host. My config uses all native Linux networking constructs. It does not make use of the newer “team” method of interface aggregation and it definitely does not make use of Network Manager; as a matter of fact unless you have express need for it I suggest you uninstall Network Manager as it can cause grief in your configuration. As with all my other KVM related write-ups, this is based on EL7 type hosts, CentOS 7.0 in my case. If you wish to adapt it for other flavors of Linux this may still give you a good starting point.

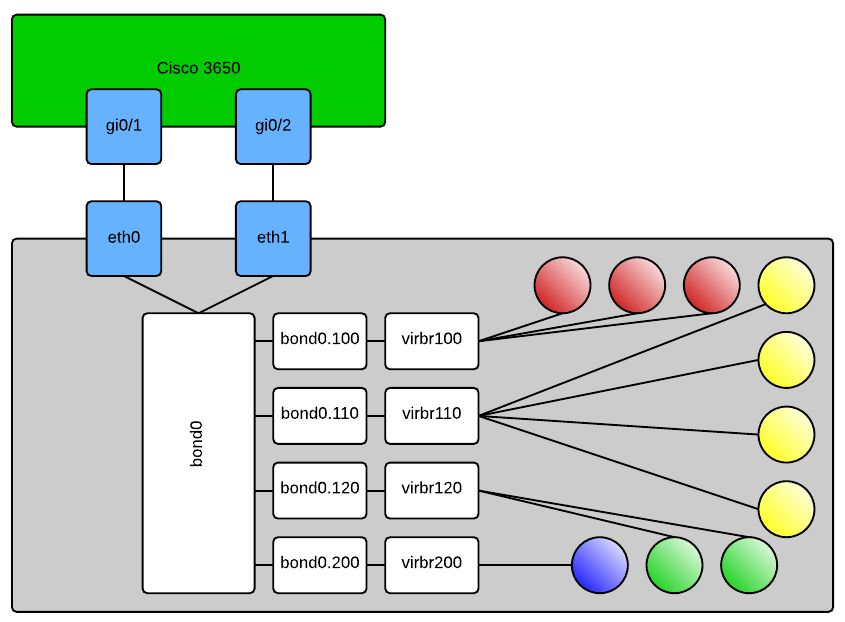
Here is an approximation of what it should look like when you’re done:


In case it’s not obvious, the shaded balls are your KVM domains. When configuring your new domains you will select the “Specify shared device name” option in virt-manager and type out the bridge you want the domain connected to. Or alternatively if you’re hand crafting your domain’s XML file it will look like this:

<interface type='bridge'>
  <mac address='ff:ff:ff:ff:ff:ff'/>
  <source bridge='virbr120'/>
  <target dev='vnet0'/>
  <model type='rtl8139'/>
  <alias name='net0'/>
  <address type='pci' domain='0x0000' bus='0x00' slot='0x03' function='0x0' />
</interface>

This would connect your VM to VLAN120 per my config above. Obviously many other things in this XML are domain and environment specific so don’t just try to copy and paste that and expect your machine to work, if you’re hand editing XML – know what you’re doing. Some of the other configs that you’ll need are as follows:

Cisco 3650:

sw# config t
sw(config)# interface range gi0/1,gi0/2
sw(config-if-range)# switchport trunk encapsulation dot1q
sw(config-if-range)# switchport trunk allowed vlan 100,110,120,200
sw(config-if-range)# switchport mode trunk
sw(config-if-range)# channel-group 1 mode on
sw(config-if-range)# exit
sw(config)# interface po1
sw(config-if)# switchport trunk encapsulation dot1q
sw(config-if)# switchport trunk allowed vlan 100,110,120,200
sw(config-if)# switchport mode trunk
sw(config-if)# description "KVM Server 1 VMNetwork bonded and trunked"

On your KVM host:

/etc/modprobe.d/bond0.conf:

alias bond0 bonding

/etc/sysconfig/network-scripts/ifcfg-eth0:

DEVICE=eth0
ONBOOT=yes
NM_CONTROLLED=no
BOOTPROTO=none
USERCTL=no
MASTER=bond0
SLAVE=yes

Make eth1 or whatever your 2nd adapter look similar, obviously change the DEVICE= line

/etc/sysconfig/network-scripts/ifcfg-bond0:

DEVICE=bond0
NM_CONTROLLED=no
ONBOOT=yes
BOOTPROTO=none
USERCTL=no
BONDING_OPTS="miimon=100 mode=4 lacp_rate=1"

/etc/sysconfig/network-scripts/ifcfg-bond0.100:

DEVICE=bond0.100
ONBOOT=yes
VLAN=yes
BOOTPROTO=none
NM_CONTROLLED=no
BRIDGE=virbr100

Like the physical interfaces, you can copy/paste this for the other VLANs you want to include in your configuration, you will have to change the DEVICE= line and BRIDGE= line in each separate config file.

/etc/sysconfig/network-scripts/ifcfg-virbr100:

DEVICE=virbr100
ONBOOT=YES
TYPE=Bridge
DELAY=0
BOOTPROTO=none

This one is another copy/paste candidate to bridge you into any of your VLAN interfaces, this time the only line you’ll need to modify as you copy and paste is DEVICE=. If you’d like you can add an IP address, subnet mask, etc to any of the bridge interfaces and then use that to connect to your KVM server. For me I prefer to have dedicated out-of-band interfaces for management purposes so all of my bridges are without layer 3 termination.

That’s it.

CentOS 7, Live Block Migration, getting the right qemu binary built and installed

You were all excited because you read my other post, but you didn’t pay attention to the part about needing a special version of qemu-kvm and were saddened to be hit with this:

error: unsupported configuration: block copy is not supported with this QEMU binary

Don’t fret, I’ll help you get where you want to go. Do everything as root, and don’t do it on a production system … duh

Get your development environment ready:

# yum install -y rpm-build redhat-rpm-config make gcc
# mkdir -p ~/rpmbuild/{BUILD,RPMS,SOURCES,SPECS,SRPMS}
# echo '%_topdir %(echo $HOME)/rpmbuild' > ~/.rpmmacros

Get your source rpm and prerequisites – note that while this is current as of this posting, things could change. Up to you to handle keeping yourself current:

# wget http://ftp.redhat.com/redhat/linux/enterprise/6Server/en/RHEV/SRPMS/qemu-kvm-rhev-1.5.3-60.el7_0.7.src.rpm
# yum install -y zlib-devel SDL-devel texi2html gnutls-devel cyrus-sasl-devel libtool libaio-devel pciutils-devel pulseaudio-libs-devel libiscsi-devel libattr-devel libusbx-devel usbredir-devel texinfo spice-protocol spice-server-devel libseccomp-devel libcurl-devel glusterfs-api-devel glusterfs-devel systemtap systemtap-sdt-devel nss-devel libjpeg-devel libpng-devel libuuid-devel bluez-libs-devel brlapi-devel check-devel libcap-devel pixman-devel librdmacm-devel iasl ncurses-devel

Build your binary:

# rpmbuild --rebuild qemu-kvm-rhev-1.5.3-60.el7_0.7.src.rpm

Install your binary and its dependencies. Enjoy blockcopy funcitonality:

# yum install -y rpmbuild/RPMS/x86_64/*