Category Archives: Technology junk

I’m a SAN administrator. Stuff relating to system/network/storage administration goes here.

KVM Networking, bond & bridge with VLANs

I never found a complete tutorial on setting up KVM networking the way I wanted. One thing that VMware has everyone beat on is simple and effective network configurations. KVM hosts can be just as good, but it won’t draw the pictures for you so it’s difficult to visualize what’s going on and troubleshoot it when things are going wrong.

This write-up should give you all the information you need to create a robust, bonded and VLAN aware “virtual switch” configuration on your KVM host. My config uses all native Linux networking constructs. It does not make use of the newer “team” method of interface aggregation and it definitely does not make use of Network Manager; as a matter of fact unless you have express need for it I suggest you uninstall Network Manager as it can cause grief in your configuration. As with all my other KVM related write-ups, this is based on EL7 type hosts, CentOS 7.0 in my case. If you wish to adapt it for other flavors of Linux this may still give you a good starting point.

Here is an approximation of what it should look like when you’re done:


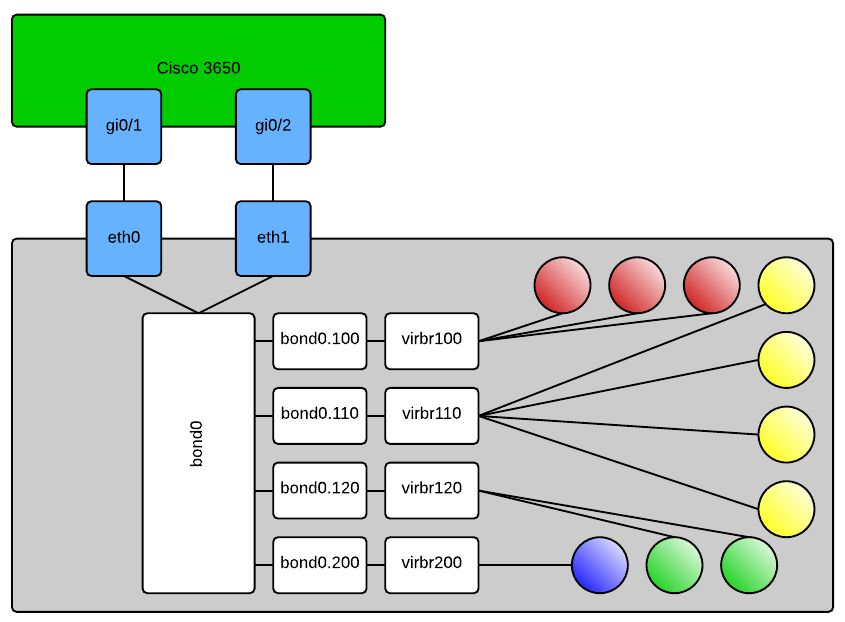
In case it’s not obvious, the shaded balls are your KVM domains. When configuring your new domains you will select the “Specify shared device name” option in virt-manager and type out the bridge you want the domain connected to. Or alternatively if you’re hand crafting your domain’s XML file it will look like this:

<interface type='bridge'>
  <mac address='ff:ff:ff:ff:ff:ff'/>
  <source bridge='virbr120'/>
  <target dev='vnet0'/>
  <model type='rtl8139'/>
  <alias name='net0'/>
  <address type='pci' domain='0x0000' bus='0x00' slot='0x03' function='0x0' />
</interface>

This would connect your VM to VLAN120 per my config above. Obviously many other things in this XML are domain and environment specific so don’t just try to copy and paste that and expect your machine to work, if you’re hand editing XML – know what you’re doing. Some of the other configs that you’ll need are as follows:

Cisco 3650:

sw# config t
sw(config)# interface range gi0/1,gi0/2
sw(config-if-range)# switchport trunk encapsulation dot1q
sw(config-if-range)# switchport trunk allowed vlan 100,110,120,200
sw(config-if-range)# switchport mode trunk
sw(config-if-range)# channel-group 1 mode on
sw(config-if-range)# exit
sw(config)# interface po1
sw(config-if)# switchport trunk encapsulation dot1q
sw(config-if)# switchport trunk allowed vlan 100,110,120,200
sw(config-if)# switchport mode trunk
sw(config-if)# description "KVM Server 1 VMNetwork bonded and trunked"

On your KVM host:

/etc/modprobe.d/bond0.conf:

alias bond0 bonding

/etc/sysconfig/network-scripts/ifcfg-eth0:

DEVICE=eth0
ONBOOT=yes
NM_CONTROLLED=no
BOOTPROTO=none
USERCTL=no
MASTER=bond0
SLAVE=yes

Make eth1 or whatever your 2nd adapter look similar, obviously change the DEVICE= line

/etc/sysconfig/network-scripts/ifcfg-bond0:

DEVICE=bond0
NM_CONTROLLED=no
ONBOOT=yes
BOOTPROTO=none
USERCTL=no
BONDING_OPTS="miimon=100 mode=4 lacp_rate=1"

/etc/sysconfig/network-scripts/ifcfg-bond0.100:

DEVICE=bond0.100
ONBOOT=yes
VLAN=yes
BOOTPROTO=none
NM_CONTROLLED=no
BRIDGE=virbr100

Like the physical interfaces, you can copy/paste this for the other VLANs you want to include in your configuration, you will have to change the DEVICE= line and BRIDGE= line in each separate config file.

/etc/sysconfig/network-scripts/ifcfg-virbr100:

DEVICE=virbr100
ONBOOT=YES
TYPE=Bridge
DELAY=0
BOOTPROTO=none

This one is another copy/paste candidate to bridge you into any of your VLAN interfaces, this time the only line you’ll need to modify as you copy and paste is DEVICE=. If you’d like you can add an IP address, subnet mask, etc to any of the bridge interfaces and then use that to connect to your KVM server. For me I prefer to have dedicated out-of-band interfaces for management purposes so all of my bridges are without layer 3 termination.

That’s it.

CentOS 7, Live Block Migration, getting the right qemu binary built and installed

You were all excited because you read my other post, but you didn’t pay attention to the part about needing a special version of qemu-kvm and were saddened to be hit with this:

error: unsupported configuration: block copy is not supported with this QEMU binary

Don’t fret, I’ll help you get where you want to go. Do everything as root, and don’t do it on a production system … duh

Get your development environment ready:

# yum install -y rpm-build redhat-rpm-config make gcc
# mkdir -p ~/rpmbuild/{BUILD,RPMS,SOURCES,SPECS,SRPMS}
# echo '%_topdir %(echo $HOME)/rpmbuild' > ~/.rpmmacros

Get your source rpm and prerequisites – note that while this is current as of this posting, things could change. Up to you to handle keeping yourself current:

# wget http://ftp.redhat.com/redhat/linux/enterprise/6Server/en/RHEV/SRPMS/qemu-kvm-rhev-1.5.3-60.el7_0.7.src.rpm
# yum install -y zlib-devel SDL-devel texi2html gnutls-devel cyrus-sasl-devel libtool libaio-devel pciutils-devel pulseaudio-libs-devel libiscsi-devel libattr-devel libusbx-devel usbredir-devel texinfo spice-protocol spice-server-devel libseccomp-devel libcurl-devel glusterfs-api-devel glusterfs-devel systemtap systemtap-sdt-devel nss-devel libjpeg-devel libpng-devel libuuid-devel bluez-libs-devel brlapi-devel check-devel libcap-devel pixman-devel librdmacm-devel iasl ncurses-devel

Build your binary:

# rpmbuild --rebuild qemu-kvm-rhev-1.5.3-60.el7_0.7.src.rpm

Install your binary and its dependencies. Enjoy blockcopy funcitonality:

# yum install -y rpmbuild/RPMS/x86_64/*

Steese cleanup, a decade in the making.

Last week I spent in Alaska. The purpose of the trip has been a purpose many trips have had as an aside, but this time it just had to get done. In Fox where my parents live only 1Mb Internet service is available. Their building also has a couple of tenants, all of which share the same Internet service. Up until last week they just had 4 modems, one person would connect to one, another to another, sometimes they didn’t all work and someone would switch out, etc. It was a big mess. To add to the logical mess of things, 10 years of wiring additions without clean and tidy installation got to be too much to handle.

The cleanup performed in 2005 – Before:


and after:


I felt pretty OK about that, but after 10 years of negligence this is where things ended up:

To start I removed… everything. I gutted all the clearly unnecessary wiring and relocated the modems to a more suitable location out of the way. This photo also includes the new patch panel which is probably the most substantial part of the cleanup, none of my before photos included the dangling wiring mess caused by the lack of a proper patch panel for the building:

Yes, I’m unwilling to provide free advertisement for the abysmal company that provides that building with Internet services.

Here you can see my punchdown work, not that I’m particularly proud of it, it is what it is:


And the dressing:

After the POE injectors were velcro’d up, router was installed and cabled, switch was installed and cabled, here is the final product:

 The patchwork between the panel and the switch leaves a bit to be desired, but there wasn’t too much I could do with it since they’re so close together. The other part of this project was some outdoor cleanup, unfortunately I didn’t grab a before picture, but here is the after:

Note the pile of cable that got removed. There was excess draped all over, some even had become part of the weed growth at the base of the building. It’s not pretty, but it’s better than it was.


KVM Live Block Migration – My Recipe

In order for this to work you will need RHEV versions of qemu-kvm. The versions included in CentOS7 (my platform) don’t support the blockcopy command in virsh.

Start by dumping the xml for the domain to somewhere you can grab it again later:

[root@kvmhost ~]# virsh dumpxml guest1 > /var/tmp/guest1.xml

Make sure the domain is not persistent:

[root@kvmhost ~]# virsh undefine guest1
Domain guest1 has been undefined

The actual migration (you may wish to check that you’re not overwriting the target, highlighted in red):

[root@kvmhost ~]# virsh blockcopy guest1 /kvm/guest1.img /var/lib/libvirt/images/storagehost-NFS4/guest1.img --wait --verbose --pivot
Block Copy: [100 %]
Successfully pivoted

Redefine the domain, double check it:

[root@kvmhost ~]# virsh define /var/tmp/guest1.xml
Domain guest1 defined from /var/tmp/guest1.xml
[root@kvmhost ~]# virsh dominfo guest1
Id: 9
Name: guest1
UUID: e440e5bd-6d71-4807-a276-11477b764751
OS Type: hvm
State: running
CPU(s): 1
CPU time: 438.6s
Max memory: 3145728 KiB
Used memory: 3145728 KiB
Persistent: yes
Autostart: disable
Managed save: no
Security model: none
Security DOI: 0

Verify that the source file is no longer the disk in use and erase the file (if you want):

[root@kvmhost ~]# lsof | grep /kvm/guest1.img
[root@kvmhost ~]# rm /kvm/guest1.img
rm: remove regular file ‘/kvm/guest1.img’? y

Done