Tag Archives: HowTo

Adito Security Certificate – Pain in the butt, but possible

Adito (formerly OpenVPN-ALS) is an amazingly wonderful piece of software. Honestly I can’t figure out why more FOSS advocates don’t pick up the pieces of the project and continue to develop on it. I guess largely it does what it’s supposed to do and doesn’t need much in the way of updating, though it would be nice if the plugin repositories were still up and running and such.

That said, I run Adito in 3 locations. For 2 of my locations the self-signed server certificate Adito creates and installs during the setup wizard is adequate. For 1 location though I prefer to offer the appearance of a truly secure and trusted site.

I’ll start by sharing the links I had to visit and inquire with to make all this work in case my write-up falls short for anyone reading it:

Discussion Topic on Sourceforge page

Instructions and discussion – Import private key and certificate into Java Key Store from agentbob.info

Github page for importkey tool that I used

I perused many many other pages, but these 3 gave me all the parts I needed to complete my task.

The server tools you’ll need will be openssl and jdk which you’ll have as a prerequisite to adito.

My installation is performed on CentOS 6.3 with Java jdk 1.7.0 u13. If any of the command I tell you to issue below don’t work it’s probably because your path is broken to java binaries.

It helps to create a working directory on your server so that all your files are glommed together in one place and not mixed in with other junk. Before you finish there will be quite a collection.

Step one – create your private key and certificate request:

openssl req -out fqdn.csr -new -newkey rsa:2048 -nodes -keyout fqdn.key

As a sidenote, if you compare this documentation with that of the folks on the Sourceforge discussion bored you’ll see that I skipped one of their steps. I’m fairly certain the `openssl req -x509` business is unnecessary. If someone can prove me wrong please let me know and I’ll update this documentation to reflect that.

Step two – submit your CSR (fqdn.csr from above) to the company you wish to issue you a certificate, follow their instructions to get your 3rd party trusted cert. In my case I was provided with 3 certificates in return, the one signed against my CSR, an intermediate and a root. Making note of what they need bundled together to form a valid chain is going to be important, and it will be different for each company. Put your fqdn.crt, intermediate.crt and root.crt into your working folder.

Step three – Convert all of your PEM formatted .crt files into DER format:

for cert in fqdn.crt intermediate.crt root.crt; do openssl x509 -in $cert -inform PEM -out cert.der -outform DER; done

Step four – Convert your private key to DER format as well:

openssl pkcs8 -topk8 -nocrypt -in fqdn.key -inform PEM -out fqdn.key.der -outform DER

Step five – cat the certificates together. I’m not sure if order matters, but I did it from my cert back to the root and that worked:

cat fqdn.crt.der intermediate.crt.der root.crt.der > fqdn.bundle.crt.der

Step six – Copy the ImportKey.java source to your machine. You can just click on the link either here or from the agentbob.info link above and copy/paste the source into a text editor on your server. I had to make a change in the source (following the advice of somebody else who had a similar problem and posted the solution in the agentbob.info article’s comments) in order for the tool to work with chained/bundled certificates. I’ve created a diff to use to patch said source, you can also just copy and paste it into your text editor.

patch ImportKey.java ImportKey.java.diff

Step seven – Compile and run the ImportKey application:

javac ImportKey.java

java ImportKey fqdn.key.der fqdn.bundle.crt.der

Note that the resulting keystore file is going to be in your home directory, so if you’re running as root it will be /root/keystore.ImportKey. It has the alias “importkey” as well as the keystore password “importkey”; CHANGE IT:

Step eight – change the keystore password for your keystore:

keytool -importkeystore -srckeystore /root/keystore.ImportKey -destkeystore importkey.jks

When running the above command you’ll be asked to issue the new keystore password – do it. It will eventually ask you for the source keystore password, as mentioned above that password is “importkey”.

If your adito server doesn’t have a web browser you need to get the file to a machine that does have a web browser, as it’s through the web interface that we’ll be importing the newly created keystore – do that now.

Step nine – rerun `ant install`from your adito installation directory, if your adito server is currently running, stop it:

cd /opt/adito0.9.1
/etc/init.d/adito stop
ant install

Step nine, part 2 – When you get to the bit about “Starting installation wizard……….Point your browser to http://aditoserver:28080″ do just that. There will be 2 screens to be concerned with:

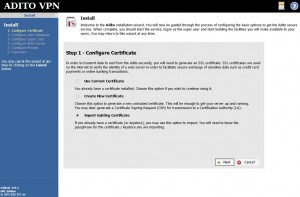
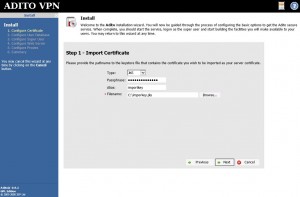
Select “Import Existing Certificate” on the first screen.


Fill in all the pertinent information on the following screen. (ignore my typo please)

The remaining install screens should remember your settings from the prior install. If this is your first time running `ant install`, configure according to your needs.

When finished issue an adito start command:

/etc/init.d/adito start

And you should be finished. Open your adito site in a browser and verify your new certificate is installed and being presented.
 

Bareos and free open source backup for MSSQL

Here is my way. I’ve actually had this up and running for some time in another environment using SQL Server Standard 2008. I’m not in need of configuring a new backup for a 2012 SQL Express instance. There are a few parts, obviously. This article assumes you can configure a Bareos Windows client, if not there are plenty of other tutorials to help with that.

Part 1 is to create a sql command that will backup your databases to a file in the location of your choosing. I choose to keep all of my scripts as well as backup files in the same location so that if I ever have to restore I can figure out what it is exactly I did to get the backup working in the first place.

  • Launch SQL Server Management Studio (go get a cup of coffee while you wait for it to load)
  • Connect using whatever credentials give you some pretty hefty rights to the database or databases you want backed up.
  • Drill into the Database server, Databases menu items, then right click on the database you want to work with, select Tasks and Back Up…
  • The only thing you should have to change in the resulting dialogue is where you want it saved. The default will work fine, but as mentioned I recommend keeping backup scripts and backup files in 1 easy to find work area. For me it’s going to be nice and easy “c:\dbbackups”. There may be performance or capacity implications you’ll have to take to mind in your environment. Also if you do like me and create a folder at the root it’s a good idea to pair back the root permissions on that folder.
  • Don’t hit OK, that will back up your database, not necessarily what you want now. Tap the down arrow near the Script button at the top of the dialogue and choose “Script action to file”. For me I’m putting it in the folder mentioned before.

Step 2 is to create a script or batch file or something that Bareos can call to have the backup run. The file you execute should not complete until the backup file is created so that Bareos doesn’t try to backup the file until it exists. I believe Bareos even halts and “fails” the backup if the return status from the script is not 0, I’ll probably verify that later. Mine is a simple file that deletes yesterday’s backup then creates today’s backup:

erase "C:\dbbackup\*.bak"
sqlcmd -E -i "C:\dbbackup\backup.sql"

I could add more logic here, but it seems I don’t need to. This has been reliable for me in the past.

Next Step is to configure the backup FileSet, Job and Schedule. Here are what mine look like:

FileSet {
  Name = "c_dbbackups"
  Include {
    Options {
      Signature = MD5
      Drive Type = fixed
      IgnoreCase = yes
    }
    File = c:/dbbackups
  }
}
Job {
  Name = "hostname_db"
  Type = Backup
  FileSet = "c_dbbackups"
  Schedule = "NightlyFull_2000"
  Storage = File
  Messages = Standard
  Priority = 10
  Pool = Database
  Client = "hostname-fd"
  ClientRunBeforeJob = "c:/dbbackups/backup_db.cmd"
}
Schedule{
  Name = "NightlyFull_2000"
  Run = Level=Full sun-sat at 20:00
}

The obvious key component is the ClientRunBeforeJob directive in the Job definition. This makes sure to run the MS SQL backup prior to running the Bareos file backup.

I should mention the reason I’m doing Full nightly… obviously this method could be renamed cheapass backup. As such there is no interaction between the actual SQL backup and the file backup Bareos is performing. You could do a differential backup (and I have in other installations where bytes are more scarce and databases are bigger) but the actual differential part of it is done way back in step one when you’re creating the MSSQL backup script. If you do this I recommend backing up to a separate file in that same all encompassing directory, that way all the crap you need is there, the scripts, the full, and the diff. If you’re backing up a 500GB DB and you only have a couple T to store to… you’ll have to do something like this.

And then we test… Did you expect this error, I did?

ClientBeforeJob: The server principal "NT AUTHORITY\SYSTEM" is not able to access the database "DATABASENAME" under the current security context.

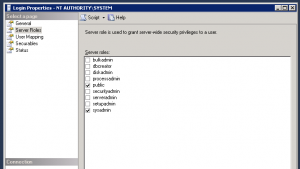
So last step is we have to run that .CMD in a security context that has rights to backup the database. The easy solution is to go back into your SQL Server Management Studio, expand the DB server, Security, and Logins then right-click on NT AUTHORITY\SYSTEM and open the properties dialogue. In there highlight Server Roles in the left pane then check sysadmin in the right pane.


After this you can login to BAT or bconsole or however you choose and test your job again.

Of course even if it appears to work, you should test your restores, which is a whole different ball of wax. If you’re lucky like me you have a test server that you can do your restore to since testing restores on a production MSSQL system is an absolute bear. Remember, if you haven’t tested restores, you don’t have backups!

Ghastly cursor performance XenApp 6.5 –> RDP –> 2012 Server

Unfortunately since XenApp 6.5 doesn’t support 2012 we’re forced to use RDP to access those desktops instead of just publishing them as desktops. It sucks, but it is a tolerable situation – until you actually do it. The cursor performance for me by default was terrible. I felt like I was working on an X-client hosted from Germany. Typical behavior for the cursor when in an RDP session is that it moves as fluid as on your own desktop, not so with 2012. I thought maybe the solution was to upgrade to Remote Desktop Client 8 on the XenApp host since RDPing straight from my PC (across the Internet) yielded fine results. That had no useful affect. The solution ended up being a simple UI change on the client end.


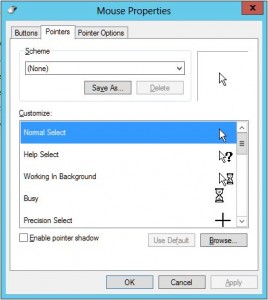
“Enable pointer shadow” UNCHECK IT! Night and day, try it.

As a funny aside, if I had a 2008r2 RDP window open inside the 2012 RDP window, the behavior inside the RDP inside the RDP was normal and good. Once I “cursored” out of the RDP inside the RDP into the upper level RDP behavior got funky again, whatever.

Quickbooks Save as PDF on Server 2012 or Win8 — my method

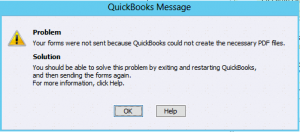
Apparently the XPS driver changed in Win8/Srv2012 such that QB 2011 and beyond get the following error (or something like it) when trying to save invoices as PDF or E-mail:

If you’re using QB 2013, just update to the latest release using the “update QuickBooks” option under the help menu and everything should *just work* without any voodoo. I have to support QB 2011-2013 so I unfortunately didn’t have that easy option. For the older versions you can google a good handful of sites with troubleshooting and remediation processes including QB own documentation. None of the few I researched helped me, but logic and simplicity prevailed.

  1. In my case – get the users out and `change user /install` since I’m on a TS
  2. Delete the Builtin “Microsoft XPS Document Writer” printer as well as the associated driver “Microsoft XPS Document Writer v4″ (a reboot may be necessary after deleting the printer to get Windows to let go of the driver files)
  3. Reboot now – just for good measure.
  4. Get your hands on the older version of the driver. It’s spread about on the Internet, google around. Unzip it to somewhere that you can access it.
  5. Add a new printer.
    1. Choose a local printer
    2. Create a new port of type “local port” called “XPSPort”
    3. Use the driver in the folder you unzipped
  6. Test

This worked for me. If you have trouble shoot me a message and I can maybe help you figure out what’s different between our systems. I am surprised by the amazing number of people who have made the process way too complicated.