B2B Credit Nonesense

Recently in my workplace we made some pretty serious gear shifts with regard to storage.  Being vendor agnostic as I always strive to be I will say that our go-to fabric vendor changed as well as our go-to disk vendor. Since the change things work, but the more I dig into what’s going on under the hood, the more I feel like I’m living in a house of cards.

The change came as the result of 2 companies merging and coalescing on one hardware platform for all systems. Going in with the blinders on I was absolutely indifferent to the fabric change since I’ve worked with the new vendor’s gear in the past and took a liking to it, and as for the storage vendor they had a clean slate to start with so I had no reservations there either. In erecting our new gear some months ago we worked with staff from the company we merged with so as to build like for like environments to ease the merging environments down the road. One thing that made me quite suspect of either the gear we were installing or the practices of the personnel in the other organization was their suggestion to modify b2b credits on the storage side switch ports. Scratching my head I said that I prefer to leave port settings default and only make adjustments AFTER we’ve seen a symptom arise that suggests a need to deviate from default.

Fast forward about 3 quarters and we have 3 new arrays from ACME Storage, 2 directors and 6 pizza box FC switches from ACME SAN. Everything *works* but now that I’ve had time to breath I’m finding things in our environment I don’t like. Let’s compare counters from the busiest ISL links (primaries for a MetroCluster FCVI), before and after. Note that the before counters were last reset about 18 months prior to the dismantling of the ISL while the counters for the new ISL port are reset daily by a script run by our peers:

        Frames Transmitted   B2B Credit Zero Errors   B2BC0 Percentage
Old     2657260246611        2377700058               .089%
New     2851542621           1306395534               45.8%

Both of these ISLs were configured with the staff from the switch manufacturer onsite and configured per best practices published by NetApp. As a matter of fact on the new configuration the B2B credit allocation was padded above and beyond the 150% padding that NetApp recommends. This is the ugliest counter to look at. Other ports have seen similar increases in errors, and seemingly for no good reason. Our production EMR has 8 host ports allocated for both the active and standby nodes, and the standby node is truly standby. Even still I’m seeing many b2b credit zero errors every second on those host ports, not the storage ports.

Mostly this is a pointless diatribe about changes I’m seeing. I’m truly concerned that I’m going to get to start micro-managing my FC ports in order to maintain performance and keep error counters low. If I reach that point I will no doubt be writing another post titled “Don’t buy this vendors junk unless you like being in the business of keeping the lights on.” Watch for that one.
Bacula or Bareos query for all backup copies of files in a directory

A customer gave me a vague description of where some files that he needed restored were, and also a vague timeline for when they needed to be restored from. I wanted to give him a list of all the files under a specific path and moreover all the dates from whence those files were backed up.

First ID the Path you care about:

SELECT * FROM Path WHERE Path LIKE 'C:/YOUR/PATH/HERE%'

Make note of the resulting PathIds. In my case the ones I care about are 16221 and 16220.

SELECT File.FileId, Path.Path, Filename.Name, Job.StartTime
FROM File
INNER JOIN Path ON Path.PathId=File.PathId
INNER JOIN Filename ON File.FilenameId=Filename.FilenameId
INNER JOIN Job ON File.JobId=Job.JobId
WHERE
File.PathID='16221'
OR File.PathID='16220';

KVM Networking, bond & bridge with VLANs

I never found a complete tutorial on setting up KVM networking the way I wanted. One thing that VMware has everyone beat on is simple and effective network configurations. KVM hosts can be just as good, but it won’t draw the pictures for you so it’s difficult to visualize what’s going on and troubleshoot it when things are going wrong.

This write-up should give you all the information you need to create a robust, bonded and VLAN aware “virtual switch” configuration on your KVM host. My config uses all native Linux networking constructs. It does not make use of the newer “team” method of interface aggregation and it definitely does not make use of Network Manager; as a matter of fact unless you have express need for it I suggest you uninstall Network Manager as it can cause grief in your configuration. As with all my other KVM related write-ups, this is based on EL7 type hosts, CentOS 7.0 in my case. If you wish to adapt it for other flavors of Linux this may still give you a good starting point.

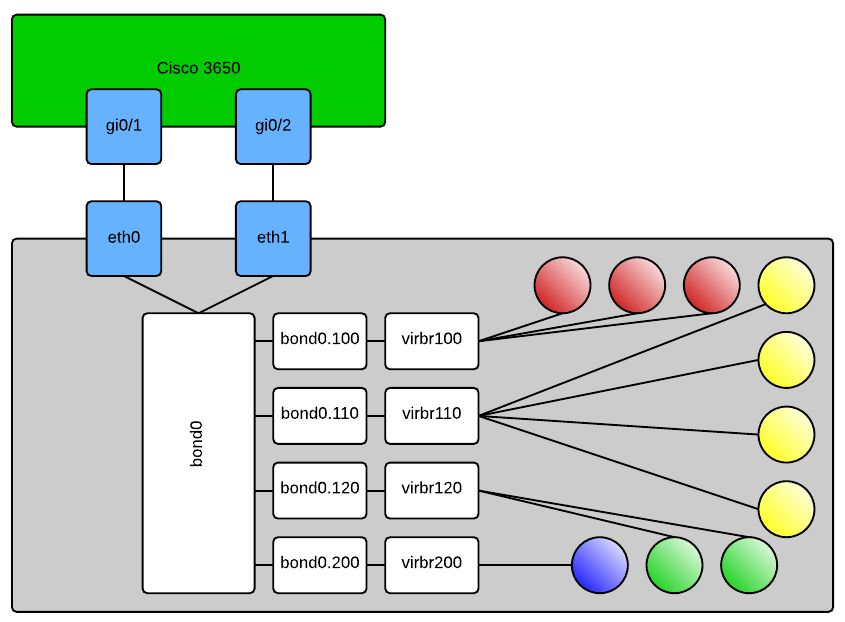
Here is an approximation of what it should look like when you’re done:


In case it’s not obvious, the shaded balls are your KVM domains. When configuring your new domains you will select the “Specify shared device name” option in virt-manager and type out the bridge you want the domain connected to. Or alternatively if you’re hand crafting your domain’s XML file it will look like this:

<interface type='bridge'>
  <mac address='ff:ff:ff:ff:ff:ff'/>
  <source bridge='virbr120'/>
  <target dev='vnet0'/>
  <model type='rtl8139'/>
  <alias name='net0'/>
  <address type='pci' domain='0x0000' bus='0x00' slot='0x03' function='0x0' />
</interface>

This would connect your VM to VLAN120 per my config above. Obviously many other things in this XML are domain and environment specific so don’t just try to copy and paste that and expect your machine to work, if you’re hand editing XML – know what you’re doing. Some of the other configs that you’ll need are as follows:

Cisco 3650:

sw# config t
sw(config)# interface range gi0/1,gi0/2
sw(config-if-range)# switchport trunk encapsulation dot1q
sw(config-if-range)# switchport trunk allowed vlan 100,110,120,200
sw(config-if-range)# switchport mode trunk
sw(config-if-range)# channel-group 1 mode on
sw(config-if-range)# exit
sw(config)# interface po1
sw(config-if)# switchport trunk encapsulation dot1q
sw(config-if)# switchport trunk allowed vlan 100,110,120,200
sw(config-if)# switchport mode trunk
sw(config-if)# description "KVM Server 1 VMNetwork bonded and trunked"

On your KVM host:

/etc/modprobe.d/bond0.conf:

alias bond0 bonding

/etc/sysconfig/network-scripts/ifcfg-eth0:

DEVICE=eth0
ONBOOT=yes
NM_CONTROLLED=no
BOOTPROTO=none
USERCTL=no
MASTER=bond0
SLAVE=yes

Make eth1 or whatever your 2nd adapter look similar, obviously change the DEVICE= line

/etc/sysconfig/network-scripts/ifcfg-bond0:

DEVICE=bond0
NM_CONTROLLED=no
ONBOOT=yes
BOOTPROTO=none
USERCTL=no
BONDING_OPTS="miimon=100 mode=4 lacp_rate=1"

/etc/sysconfig/network-scripts/ifcfg-bond0.100:

DEVICE=bond0.100
ONBOOT=yes
VLAN=yes
BOOTPROTO=none
NM_CONTROLLED=no
BRIDGE=virbr100

Like the physical interfaces, you can copy/paste this for the other VLANs you want to include in your configuration, you will have to change the DEVICE= line and BRIDGE= line in each separate config file.

/etc/sysconfig/network-scripts/ifcfg-virbr100:

DEVICE=virbr100
ONBOOT=YES
TYPE=Bridge
DELAY=0
BOOTPROTO=none

This one is another copy/paste candidate to bridge you into any of your VLAN interfaces, this time the only line you’ll need to modify as you copy and paste is DEVICE=. If you’d like you can add an IP address, subnet mask, etc to any of the bridge interfaces and then use that to connect to your KVM server. For me I prefer to have dedicated out-of-band interfaces for management purposes so all of my bridges are without layer 3 termination.

That’s it.

CentOS 7, Live Block Migration, getting the right qemu binary built and installed

You were all excited because you read my other post, but you didn’t pay attention to the part about needing a special version of qemu-kvm and were saddened to be hit with this:

error: unsupported configuration: block copy is not supported with this QEMU binary

Don’t fret, I’ll help you get where you want to go. Do everything as root, and don’t do it on a production system … duh

Get your development environment ready:

# yum install -y rpm-build redhat-rpm-config make gcc
# mkdir -p ~/rpmbuild/{BUILD,RPMS,SOURCES,SPECS,SRPMS}
# echo '%_topdir %(echo $HOME)/rpmbuild' > ~/.rpmmacros

Get your source rpm and prerequisites – note that while this is current as of this posting, things could change. Up to you to handle keeping yourself current:

# wget http://ftp.redhat.com/redhat/linux/enterprise/6Server/en/RHEV/SRPMS/qemu-kvm-rhev-1.5.3-60.el7_0.7.src.rpm
# yum install -y zlib-devel SDL-devel texi2html gnutls-devel cyrus-sasl-devel libtool libaio-devel pciutils-devel pulseaudio-libs-devel libiscsi-devel libattr-devel libusbx-devel usbredir-devel texinfo spice-protocol spice-server-devel libseccomp-devel libcurl-devel glusterfs-api-devel glusterfs-devel systemtap systemtap-sdt-devel nss-devel libjpeg-devel libpng-devel libuuid-devel bluez-libs-devel brlapi-devel check-devel libcap-devel pixman-devel librdmacm-devel iasl ncurses-devel

Build your binary:

# rpmbuild --rebuild qemu-kvm-rhev-1.5.3-60.el7_0.7.src.rpm

Install your binary and its dependencies. Enjoy blockcopy funcitonality:

# yum install -y rpmbuild/RPMS/x86_64/*