Tag Archives: HowTo

Stop brute force SSH attacks from filling your authlog OpenBSD

I run OpenBSD on Soekris devices and have yet in my life to have this proven to be a poor choice of hardware. For my builds I use flashrd. Part of the design of flashrd is that /var is built from scratch during each boot and is mounted as a memory filesystem:

# mount | grep /var
mfs:14425 on /var type mfs (asynchronous, local, nodev, nosuid, size=131072 512-blocks)

While this is a really cool way to do things it does limit the size of your /var filesystem. In my case – on this box is slightly less than 62 MB. Usually this is way more than adequate, but there have been times that the script kiddies have caused me grief by filling /var/authlog with failed ssh login attempts:

Jan 24 06:35:34 firewall sshd[29119]: Invalid user hscroot from 180.131.138.32
Jan 24 06:35:34 firewall sshd[29119]: input_userauth_request: invalid user hscroot [preauth]
Jan 24 06:35:34 firewall sshd[29119]: Failed password for invalid user hscroot from 180.131.138.32 port 57894 ssh2
Jan 24 06:35:35 firewall sshd[29229]: Invalid user hscroot from 180.131.138.32
Jan 24 06:35:35 firewall sshd[29229]: input_userauth_request: invalid user hscroot [preauth]
Jan 24 06:35:35 firewall sshd[29119]: Connection closed by 180.131.138.32 [preauth]
Jan 24 06:35:35 firewall sshd[29229]: Failed password for invalid user hscroot from 180.131.138.32 port 48309 ssh2
Jan 24 06:35:35 firewall sshd[29229]: Connection closed by 180.131.138.32 [preauth]

Once /var is full all sorts of weird things start happening. In my case the firewall would still pass traffic, but dhcpd quits working properly (most likely due to its inability to log and place leases in /var/db/dhcpd.leases) and slowly the hosts on the network relying on dhcp die of attrition as they can no longer renew their leases. It’s gotta be fixed…

The most secure way to go about things would be to close ssh to the outside world. In my case that isn’t really an option, there are times that I’m out of town and if the S hit the F I could potentially lose one of my multiple ways inside the network to fix things. SSH on the outside firewall may someday (albeit it hasn’t yet) become my last hope. My solution is not unique, but it isn’t so ununique that it’s not worth mentioning. It’s all handled inside OpenBSD’s pf.conf file:

1) Create a table to hold the abusers:

table <abuse> persist

2) Make an addendum to your ssh rule that will limit the rate at which connections are allowed. For connections exceeding that limit put the source address in your abuse table  using the overload directive. Make sure the scope of the rule is such that it won’t limit other types of connections and also make sure it’s far enough down in your ruleset that other rules won’t hijack your ssh traffic. In my case I used a maximum of 2 connections per 15 minutes. You may wish to loosen that up a bit in case you find yourself remotely connecting to that  box often. I’d also suggest making the scope of that rule such that it doesn’t apply to connections coming from trusted networks:

pass in on em2 inet proto tcp from any to (em2) port ssh flags S/SA keep state (max-src-conn-rate 2/15, overload <abuse> flush)

3) Block the abuse table at or near the bottom of your pf.conf. Make sure you don’t have any quick rules up higher that might override this rule. You could put it higher up and use a quick rule, but I like to keep quick out of my ruleset as much as I can just as a matter of preference.

block in from <abuse>

Of course once you’re done setting it all up reload pf:

# pfctl -f /etc/pf.conf

I setup this configuration about 18 hours ago (by necessity, not forward thinking) and have since seen some fun additions to the abuse table:

# pfctl -t abuse -T show
 4.49.58.41
 54.146.218.7
 54.215.165.55
 61.160.247.8
 87.106.50.214
 103.41.124.18
 103.41.124.30
 103.41.124.31
 103.41.124.37
 103.41.124.111
 104.152.188.150
 123.57.134.96
 212.83.131.138
 221.235.188.205
 222.186.34.202
 222.219.187.9

Yay it works.

This is just a rehash from the official OpenBSD PF documentation, but unfortunately the search term “block ssh brute force OpenBSD” won’t lead you there.
KVM Networking, bond & bridge with VLANs

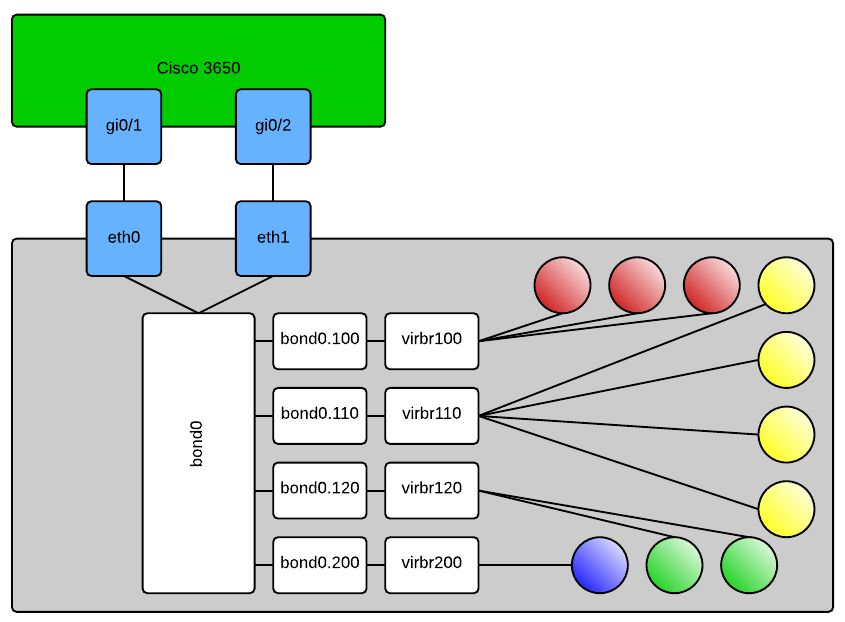
I never found a complete tutorial on setting up KVM networking the way I wanted. One thing that VMware has everyone beat on is simple and effective network configurations. KVM hosts can be just as good, but it won’t draw the pictures for you so it’s difficult to visualize what’s going on and troubleshoot it when things are going wrong.

This write-up should give you all the information you need to create a robust, bonded and VLAN aware “virtual switch” configuration on your KVM host. My config uses all native Linux networking constructs. It does not make use of the newer “team” method of interface aggregation and it definitely does not make use of Network Manager; as a matter of fact unless you have express need for it I suggest you uninstall Network Manager as it can cause grief in your configuration. As with all my other KVM related write-ups, this is based on EL7 type hosts, CentOS 7.0 in my case. If you wish to adapt it for other flavors of Linux this may still give you a good starting point.

Here is an approximation of what it should look like when you’re done:


In case it’s not obvious, the shaded balls are your KVM domains. When configuring your new domains you will select the “Specify shared device name” option in virt-manager and type out the bridge you want the domain connected to. Or alternatively if you’re hand crafting your domain’s XML file it will look like this:

<interface type='bridge'>
  <mac address='ff:ff:ff:ff:ff:ff'/>
  <source bridge='virbr120'/>
  <target dev='vnet0'/>
  <model type='rtl8139'/>
  <alias name='net0'/>
  <address type='pci' domain='0x0000' bus='0x00' slot='0x03' function='0x0' />
</interface>

This would connect your VM to VLAN120 per my config above. Obviously many other things in this XML are domain and environment specific so don’t just try to copy and paste that and expect your machine to work, if you’re hand editing XML – know what you’re doing. Some of the other configs that you’ll need are as follows:

Cisco 3650:

sw# config t
sw(config)# interface range gi0/1,gi0/2
sw(config-if-range)# switchport trunk encapsulation dot1q
sw(config-if-range)# switchport trunk allowed vlan 100,110,120,200
sw(config-if-range)# switchport mode trunk
sw(config-if-range)# channel-group 1 mode on
sw(config-if-range)# exit
sw(config)# interface po1
sw(config-if)# switchport trunk encapsulation dot1q
sw(config-if)# switchport trunk allowed vlan 100,110,120,200
sw(config-if)# switchport mode trunk
sw(config-if)# description "KVM Server 1 VMNetwork bonded and trunked"

On your KVM host:

/etc/modprobe.d/bond0.conf:

alias bond0 bonding

/etc/sysconfig/network-scripts/ifcfg-eth0:

DEVICE=eth0
ONBOOT=yes
NM_CONTROLLED=no
BOOTPROTO=none
USERCTL=no
MASTER=bond0
SLAVE=yes

Make eth1 or whatever your 2nd adapter look similar, obviously change the DEVICE= line

/etc/sysconfig/network-scripts/ifcfg-bond0:

DEVICE=bond0
NM_CONTROLLED=no
ONBOOT=yes
BOOTPROTO=none
USERCTL=no
BONDING_OPTS="miimon=100 mode=4 lacp_rate=1"

/etc/sysconfig/network-scripts/ifcfg-bond0.100:

DEVICE=bond0.100
ONBOOT=yes
VLAN=yes
BOOTPROTO=none
NM_CONTROLLED=no
BRIDGE=virbr100

Like the physical interfaces, you can copy/paste this for the other VLANs you want to include in your configuration, you will have to change the DEVICE= line and BRIDGE= line in each separate config file.

/etc/sysconfig/network-scripts/ifcfg-virbr100:

DEVICE=virbr100
ONBOOT=YES
TYPE=Bridge
DELAY=0
BOOTPROTO=none

This one is another copy/paste candidate to bridge you into any of your VLAN interfaces, this time the only line you’ll need to modify as you copy and paste is DEVICE=. If you’d like you can add an IP address, subnet mask, etc to any of the bridge interfaces and then use that to connect to your KVM server. For me I prefer to have dedicated out-of-band interfaces for management purposes so all of my bridges are without layer 3 termination.

That’s it.

CentOS 7, Live Block Migration, getting the right qemu binary built and installed

You were all excited because you read my other post, but you didn’t pay attention to the part about needing a special version of qemu-kvm and were saddened to be hit with this:

error: unsupported configuration: block copy is not supported with this QEMU binary

Don’t fret, I’ll help you get where you want to go. Do everything as root, and don’t do it on a production system … duh

Get your development environment ready:

# yum install -y rpm-build redhat-rpm-config make gcc
# mkdir -p ~/rpmbuild/{BUILD,RPMS,SOURCES,SPECS,SRPMS}
# echo '%_topdir %(echo $HOME)/rpmbuild' > ~/.rpmmacros

Get your source rpm and prerequisites – note that while this is current as of this posting, things could change. Up to you to handle keeping yourself current:

# wget http://ftp.redhat.com/redhat/linux/enterprise/6Server/en/RHEV/SRPMS/qemu-kvm-rhev-1.5.3-60.el7_0.7.src.rpm
# yum install -y zlib-devel SDL-devel texi2html gnutls-devel cyrus-sasl-devel libtool libaio-devel pciutils-devel pulseaudio-libs-devel libiscsi-devel libattr-devel libusbx-devel usbredir-devel texinfo spice-protocol spice-server-devel libseccomp-devel libcurl-devel glusterfs-api-devel glusterfs-devel systemtap systemtap-sdt-devel nss-devel libjpeg-devel libpng-devel libuuid-devel bluez-libs-devel brlapi-devel check-devel libcap-devel pixman-devel librdmacm-devel iasl ncurses-devel

Build your binary:

# rpmbuild --rebuild qemu-kvm-rhev-1.5.3-60.el7_0.7.src.rpm

Install your binary and its dependencies. Enjoy blockcopy funcitonality:

# yum install -y rpmbuild/RPMS/x86_64/*

Repairing the trailer from the snow damage

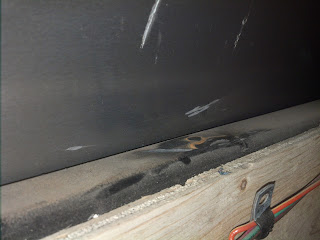
It came to be that I needed to use the trailer to move some furniture. In case you didn’t see or don’t recall here is a link to see the damage.

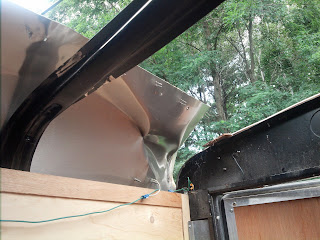
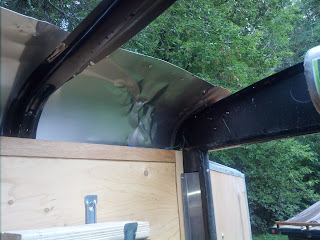
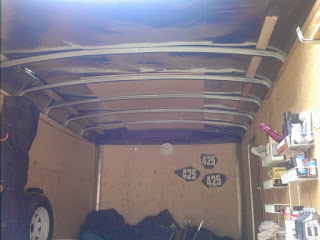
Time to repair it, or alternatively pony up $500 or so bucks to rent a truck to get from Chicago to home. The pictures can do most of the talking, but the basic process was as follows:

  1. I used it in its broken state a bit, so I first had to clean out enough stuff to be able to work inside. I also had to source the roof bows. It so happened that my mother and nephew were traveling by the manufacturer about a week and change before I needed the trailer so I asked them to stop and pick up said roof bows. They were cheap, about $20 a piece.
  2. I started by figuring out how it was assembled. Basically the roof is a big section that connects 2 corner pieces together and runs the length. It’s lapped and sandwiched together with some light pieces of laminated board inside. I removed all the screws and laminated board so that I could get the roof bows out. You can see in the pictures where I had to peel up some foil to get to the screws.
  3. I went from front to back cutting out 1 roof bow at a time and replacing it with a new one. I started by supporting the roof off the bow, cutting the bow in the center, it basically fell out with a bit of twisting and bending after being cut in half. I then had to clean the welds on the top plate so that the new bow had a nice place to sit, then I just slid the new bow in place. Wash, rinse repeat all the way back.
  4. Somewhere along the way when I was bored I cut out about 2 feet from the rear of the roof. This was the section that wasn’t going to be usable anymore and needed to be replaced. I also did my best to straighten out the parts that got kinked in the back corner.
  5. I propped the new roof bows up high and pulled them down so that they had some good tension. I then welded them.
  6. Originally the sandwich on the edges was the only thing that kept the roof bows from twisting into and away from each other. I added a third row right down the middle to increase strength. I also used 2×4 instead of the smaller laminated wood to further prevent possible twisting. I think that the original construction was probably adequate, however since I’m not an expert I figured I’d be best served by adding as much meat as I could to prevent this from happening again. I started by placing the separating structures down the top-center, then moved to the side that had come unglued the least and did the side that had separated quite a lot last so that I could do my best to pull it all tight during final assembly.
  7. Before finishing step 6 I sourced and cut to fit the new rear of the roof. It was 4 foot in length and I only cut out 2 feet so I had a nice overlap.
  8. Once the whole thing was structurally sound I crawled up on top and used that really shiny really sticky duct tape to make a seal over all the screw holes and at the seams.
  9. As a last and final protectant I used roof repair sealant everywhere I could. At the edge of all the tape seams and also at the metal seams in the mid section of the trailer and at the tail end.

Anyways, that’s the shortwinded version of how I spent almost the entire week prior to labor day weekend. Enjoy the photos.

The seam in the back corner, this is where it all started.The seam in the back corner, this is where it all started.
The seam in the back corner, this is where it all started.19-Aug-2014 18:33, Motorola XT912, 2.4, 4.6mm, 0.004 sec, ISO 100
 
Another view of what I started with.Another view of what I started with.
Another view of what I started with.23-Aug-2014 09:40, Motorola XT912, 2.4, 4.6mm, 0.004 sec, ISO 100
 
Before new roof bows - it looks someone wadded up a piece of paper then partially straightened it back out again.Before new roof bows - it looks someone wadded up a piece of paper then partially straightened it back out again.
Before new roof bows - it looks someone wadded up a piece of paper then partially straightened it back out again.23-Aug-2014 09:40, Motorola XT912, 2.4, 4.6mm, 0.006 sec, ISO 100
 
This is the remnants after removing the original roof bow, it was nice of the manufacturer to weld only on one side so they removed easily.This is the remnants after removing the original roof bow, it was nice of the manufacturer to weld only on one side so they removed easily.
This is the remnants after removing the original roof bow, it was nice of the manufacturer to weld only on one side so they removed easily.23-Aug-2014 11:49, Motorola XT912, 2.4, 4.6mm, 0.02 sec, ISO 132
 
After cleaning up and ready to have the new roof bow placed.After cleaning up and ready to have the new roof bow placed.
After cleaning up and ready to have the new roof bow placed.23-Aug-2014 11:56, Motorola XT912, 2.4, 4.6mm, 0.01 sec, ISO 141
 
The sacrificed portion of roofing.The sacrificed portion of roofing.
The sacrificed portion of roofing.23-Aug-2014 12:10, Motorola XT912, 2.4, 4.6mm, 0.002 sec, ISO 100
 
After removing the section of roof that had to go.After removing the section of roof that had to go.
After removing the section of roof that had to go.23-Aug-2014 12:10, Motorola XT912, 2.4, 4.6mm, 0.004 sec, ISO 100
 
The most mangled part that I had to save.The most mangled part that I had to save.
The most mangled part that I had to save.23-Aug-2014 12:19, Motorola XT912, 2.4, 4.6mm, 0.006 sec, ISO 100
 
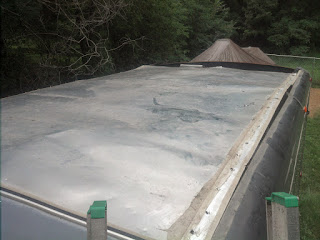
A view from the top, after I turned it into a convertible.A view from the top, after I turned it into a convertible.
A view from the top, after I turned it into a convertible.23-Aug-2014 12:56, Motorola XT912, 2.4, 4.6mm, 0.003 sec, ISO 100
 
This was as good as my hammer and 2x4 body shaping tools could get it.This was as good as my hammer and 2x4 body shaping tools could get it.
This was as good as my hammer and 2x4 body shaping tools could get it.24-Aug-2014 09:53, Motorola XT912, 2.4, 4.6mm, 0.009 sec, ISO 100
 
About halfway through replacing the old roof bows with straight/true new ones.About halfway through replacing the old roof bows with straight/true new ones.
About halfway through replacing the old roof bows with straight/true new ones.24-Aug-2014 10:52, Motorola XT912, 2.4, 4.6mm, 0.033 sec, ISO 214
 
A look at the makeshift temporary support I had going on while I cut out the twisted roof bows.A look at the makeshift temporary support I had going on while I cut out the twisted roof bows.
A look at the makeshift temporary support I had going on while I cut out the twisted roof bows.24-Aug-2014 11:00, Motorola XT912, 2.4, 4.6mm, 0.029 sec, ISO 100
 
Another view of the most pretzeled up of the roof bows.Another view of the most pretzeled up of the roof bows.
Another view of the most pretzeled up of the roof bows.24-Aug-2014 11:00, Motorola XT912, 2.4, 4.6mm, 0.035 sec, ISO 100
 
The mangled wreckage.The mangled wreckage.
The mangled wreckage.24-Aug-2014 11:39, Motorola XT912, 2.4, 4.6mm, 0.008 sec, ISO 100
 
A nice low view of the new roof bows as they're being installed.A nice low view of the new roof bows as they're being installed.
A nice low view of the new roof bows as they're being installed.24-Aug-2014 11:40, Motorola XT912, 2.4, 4.6mm, 0.041 sec, ISO 107
 
6 of the 7 roof bows in place, but not yet welded. I left the last one out as it would be exposed to the elements had I not.6 of the 7 roof bows in place, but not yet welded. I left the last one out as it would be exposed to the elements had I not.
6 of the 7 roof bows in place, but not yet welded. I left the last one out as it would be exposed to the elements had I not.24-Aug-2014 12:09, Motorola XT912, 2.4, 4.6mm, 0.018 sec, ISO 100
 
Picture as things are coming together. This is at the point where 6 of the 7 roof bows were installed inside and it was preparing for transport to my house where I'd finish the project.Picture as things are coming together. This is at the point where 6 of the 7 roof bows were installed inside and it was preparing for transport to my house where I'd finish the project.
Picture as things are coming together. This is at the point where 6 of the 7 roof bows were installed inside and it was preparing for transport to my house where I'd finish the project.24-Aug-2014 12:10, Motorola XT912, 2.4, 4.6mm, 0.001 sec, ISO 100
 
The sheet of aluminum that patched the tail end of the trailer. A full  sheet cost me $43.The sheet of aluminum that patched the tail end of the trailer. A full  sheet cost me $43.
The sheet of aluminum that patched the tail end of the trailer. A full  sheet cost me $43.26-Aug-2014 16:14, Motorola XT912, 2.4, 4.6mm, 0.001 sec, ISO 100
 
Interior is about 75% done, this picture taken as I called it a night the night prior to departure for Chicago.Interior is about 75% done, this picture taken as I called it a night the night prior to departure for Chicago.
Interior is about 75% done, this picture taken as I called it a night the night prior to departure for Chicago.29-Aug-2014 20:37, Motorola XT912, 2.4, 4.6mm, 0.1 sec, ISO 151
 
The finished product from inside. Note the 4 new LED lights, they ended up being a quite nice upgrade.The finished product from inside. Note the 4 new LED lights, they ended up being a quite nice upgrade.
The finished product from inside. Note the 4 new LED lights, they ended up being a quite nice upgrade.30-Aug-2014 11:24, Motorola XT912, 2.4, 4.6mm, 0.014 sec, ISO 100
 
The finished product.The finished product.
The finished product.30-Aug-2014 11:40, Motorola XT912, 2.4, 4.6mm, 0.002 sec, ISO 100